Tuesday, July 17, 2012

Colorful 3D Bulletin Border


Here is coat #4 and finally it is looking like it should.  I also spray painted my baskets, which were many different colors.  This was a much cheaper way to get a new color scheme.  These are the eight that I have done.  I can't wait to start putting my books in them and put my shelf back where it belongs. 

Now onto the fun stuff! Over at Peace Love And First Grade I found the beautiful "scrunchy" border. Here is what Laura's looks like:

She used long strips of paper - you can find directions at the link above.
Our paper supply at school is out (not sure if they'll be replacing it) and I still wanted to do this. So I got crepe paper.  I started out using a single roll - but this didn't work out so well.  So I did two rolls side by side and it seemed to work out well! Here are my results:

 
This is the first side - you can see how I have the two rolls side by side.


This is the corner - the hardest part!

Then, here is my final result. Yeah, I'm so proud.  Thanks Laura for the great idea!!!

Here is another great idea I found from pinterest that helped me with my bulletin boards.
I used green colored staples with the green crepe paper and blue staples on the blue paper.  They are hidden so well, and so easy to make.  All you have to do is color them with a permanent marker.


What kind of fun, out of the box, borders or bulletin board have you created?

Wednesday, July 11, 2012

Two awards! Yeah!

Jen at teaching, life, and everything in between has awarded me two awards...

 
Thanks Jen!  These are my very first woo hoo!!


Here are the rules for the 'One Lovely Blog Award':
1. Follow the person who gave you the award.
2. Link back to the person who gave you the award.
3. Share the love! Pass the award onto 15 new bloggers!


Rules for "The Versatile Blogger" Award:
1. Thank the blogger who nominated you.
2. Include a link to their site.
3. Include the award image in your post.
4. Give 7 random facts about yourself.
5. Nominate 15 other bloggers for the award.
6. When nominating, include a link to their site.
7. Let other bloggers know they've been nominated.

7 Random Facts about myself:
1.  My middle name is Wynter (yes with a y).
2. I love to dance when no one is looking!
3. I am originally from Maine.
4. I like to fold laundry.
5. My favorite color is blue - when I was a teen I even dyed my hair blue.
6. I have a pug named Milo.
7. I am right handed.

Here's the 15 blogs I'm nominating for both awards...

Monday, July 9, 2012

Painting... and Some Questions For You!

First of all... I know it has been forever since I've written on my blog. I am going to try to be more faithful to it, and hopefully when school start I will have a routine in order.


So... I have been in my classroom... painting. I had a nasty bookshelf that I wanted to bring to life. Here it is with the first coat. You can see the original blue color has dings and scratches and just needs a little life.


Sadly... painting is a whole lot harder than I imagined it to be.  I don't do it often enough, and every time I do it I think it's going to be this magical, fun event.  Yea.... no!  This book shelf needed like 3 coats of paint.  Here is the final last result.  I still have some more paint so I am going to do one more coat.


Like I said I think one more coat will make it look better.  The back panel is made from plywood so the paint does not get into all the groves very easily.  I'm not too worried about this because my book baskets will cover it up.  The next shelf was only $5 at the Re-Store (Habitat for Humanity).  I was so excited!  It was really gross and needed to be cleaned up.  I washed it down, took some of the hardware off and have plans to make a bench cushion for the top. (Like something I saw on Pinterest!)  I love the color, and will post pictures when it's all set up!

Okay, so here are my Questions for you!


1. I am currently reading the Daily 5 and I am trying to figure out how to incorporate it into a fifth grade classroom. I am looking for comments and resources from anyone who uses Daily 5/Cafe in the upper grades. 

2. In the Daily 5 book, it mentions getting away from having a desk. Has anyone gotten rid of their desk? I am seriously considering it.  I imagine all the space... and then I sit at my desk and look at all the little things on my desk. What do you do with all those things? Let me know if you've gotten rid of your desk, what do you use instead?

Thursday, January 26, 2012

Fraction Museum

This was so cool!  My students were so excited!  The assignment: "Bring in something to represent a fraction."  The results were so creative and it allowed me to see exactly what they knew about fraction numerators and denominators.  Students had to present their "museum exhibit."  Some had others guess their fractions, and others told why they chose the fraction they did.  It was very successful!
Here are some of the examples:

2/4 or 1/2 Storm Troopers

1/4 are bandaids

2/4 or 1/2 were fuzzy.  Students also guessed 1/4 had a button!

This student went all out to give us a fraction and even a circle graph of the color amounts compared to the whole bag of M&M's

3/4 blue nail polish


Create a fraction museum in your classroom.  It is amazing what you'll get, and the kids really buy into it because they can bring items and "toys" from home to make their fractions!
Have a great week!


Sunday, January 22, 2012

Teaching Fractions

I'm getting ready to start a new unit tomorrow: Fractions. 

My kiddos get excited about having their very own manipulatives so I've made them fun fraction bars. 

It's really easy!

1. Find great paper from Hobby Lobby, or AC Moore or any local craft store:

2. Photo copy a fraction bar template on the back or the fun papers, and laminate.
3. Cut the fraction bars out.


4. Finally, put them in a baggie and give them to your students.


I let my students trade them.  The only rule I gave them is that they have to trade the same denominators.  Example: I'll give you 2/12 for 2/12.  This way they will always have a complete set.
Here is a set of fraction bars that you can copy and paste into a word document.  Once you have it in a word document you can re-size the picture to the size you would like it. 

Good Luck I hope your kids like them as much as mine do!!
P.S. I am adding one more resource!
I also cut out Fraction Pies for each of my students.  Then I hole punched each fraction circle and put them together with a piece of yarn.  I like the ones at this link (click on Fraction Pies) because it also showed the students the written form of each fraction, the percent, and the decimal.  Stay posted for some more ideas with fractions!

Monday, January 9, 2012

Multiplication Disks

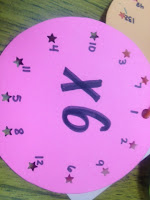
I had to share these cool multiplication disks. 
My students needed to practice their multiplication facts so I told them I would make them flash cards.  However, to make flash cards for multiplication and division facts 1 through 12 for 17 children... well, that's a lot of paper.  So I found these disks and they took far less time, and are so much cooler.  My kiddo's loved them! You can even get your students in on the fun!


So here is how to make them:
SIDE ONE
1. Cut out a circle.
2. Put 12 holes around the edge - I used a cool star punch.
3. Put x ___ (the factor i.e. 1,2,3,4 etc...) in the middle.
4. Next to each hole write the numbers 1- 12 (I wrote mine random - because I wanted my students to practice them - you could also write them in order)

SIDE TWO
1. Write  ÷ __ (same factor as above)
2. Put your finger over the hole and figure out the problem from the other side. For example: If your factor in the middle is 6 and the hole you put your finger over is 7 (from the multiplication side) do 6 x 7.  This equals 42 so write 42 on the hole.  Do this for each number.  If you provided the circles your students could do this and check it on a multiplication chart.  The act of creating these could be it's own practice. 
Here is an example of step two from above: 6 x 10  

is equal to 60.  When I flip the disk over and look at the number where my finger was it shows 60


This is such a cool tool to use in the classroom.
Hope you find it helpful in your classroom!

Tuesday, September 6, 2011

Mathulators :)

First of all... Kudos to you who are supper bloggers!  I don't know how you do it.  I'm lucky to get one post in each week - as you can see.  As hectic the start of the year has been, it has been a wonderful start.  I have modeled my groups and the right way, as well as the wrong way, to work in stations and today was the first day that we practiced the whole thing.  My kiddos did great.  We had four stations... one was with me, another one was math match (a game like memory or concentration), there was as station where students rolled the biggest number and the last one was Mathulators! The kids loved these.
I got the idea from 4th grade frolics vocabulators.  At her site she refers to Melissa Forney's site where you can order the jars.  This site used this idea with Language Arts... this didn't help me because I currently teach primarily math and science.  So, I turned it into mathulators.  Check out the pictures:

Here are the two that I made.  I wanted to find inexpensive ways to do this so I found two different containers at the dollar store. 

This one is filled with Nerds - my kids all wanted to eat them.  You can kinda see the words on the pink and blue paper.  These are words to go with our first unit of place value and numeracy.  Students had to find all the words and write them down.  For my struggling readers this helps to work with the words.


This one is a little bigger.  It has bath salts and stones in it, both came from the dollar store.  Inside this one there are cards that say a + 6 = 9 and b x 8 = 40 and c... and so on.  Students had to find the value of each letter.  This was a great day and a successful activity.  Hope your classrooms are having as much success!

Science Workshop Series #1: Elements of Workshop

I am currently reading the book "Science Workshop Reading, Writing and Thinking Like a Scientist" By Wendy Saul in hopes to pre...